Staff Alerts
The Staff Alerts tab has two sub tabs: SLA Alerts, and Arrival Alerts. These are described below.
SLA Alerts
Here, all the SLA Alerts for the Branch that you select in the drop-down list are displayed.
To add an alert, click on Add. The following window will be opened:
Enter all required alerts, by following these steps:
a Select Queue, Type (Waiting Customers / Waiting Time), and Status (Enabled / Disabled / Sent), from the drop-down lists.
b Enter Alert Level, and Reset Level. This depends on the Type you selected above. If the type was Waiting Customers, a number should be entered in these fields. If, however, Waiting Time was selected, these fields should contain number of minutes. So, for example, the Alert Level could be at 5 minutes Waiting Time and the Reset Level could be at 3 minutes Waiting Time.
c Select the Role of the Users that should receive these alerts.
d Decide whether or not an alert should only be sent to a staff member that has the selected Role and is logged in at the workstation, and is serving the selected Queue, according to his/her Work Profile.
e Select Notification (Email / SMS), from the drop-down list.
f Enter a Message and a Subject (only required for Email). You can fill in information in the Message/Subject, by inserting Parameters from the drop-down lists.
g Click Save, to save the SLA Alert setting.

If you selected SMS above, the Message or Subject is too long, you will be notified about that.
Arrival Alerts
Here, all the Arrival Alerts for the Branch that you select in the drop-down list are displayed.
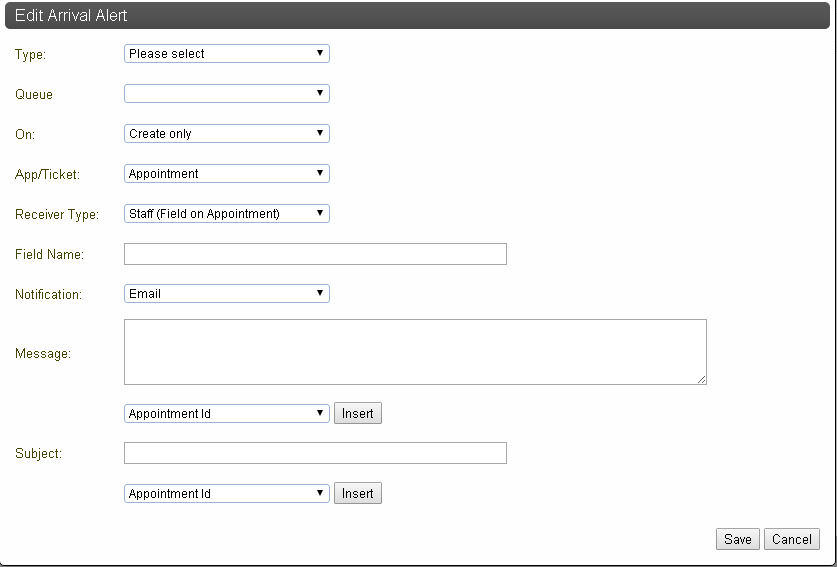
To add an alert, click on Add. The following window will be opened:
Enter all required alerts, by following these steps:
a Select Type, (Queue / Service), Queue / Service (depending on what you selected above, Queues/Services will be displayed in this list), On (Create only / Transfer only / Create and Transfer) - only available if you selected Queue above, App/Ticket (Appointment / Ticket / Any), from the drop-down lists.
b Next, select Receiver Type (Staff (Field on Appointment), Staff (Field on Ticket), Role, or Email).

Note that
Staff (Field on Appointment), and
Staff (Field on Ticket) require that you have a customised version of Orchestra. For more information, please contact Professional Services.
c If you selected Staff (Field on Ticket) or Staff (Field on Appointment) above, enter the Field Name. If you selected Role, select the wanted Role from the drop-down list. If you selected Email, enter the Email Address.
d Next, select Notification (SMS / Email), and enter the Message and Subject (only applicable for an email). You can fill in information in the Message/Subject, by inserting Parameters from the drop-down lists.
e Finally, click Save, to save the Arrival Alert setting.


 If you selected SMS above, the Message or Subject is too long, you will be notified about that.

 Note that Staff (Field on Appointment), and Staff (Field on Ticket) require that you have a customised version of Orchestra. For more information, please contact Professional Services.