Issuing Tickets - Reception
Issuing a ticket
Upon first entering an establishment, a Customer is:
a) directed to take a ticket from a kiosk or ticket printer.
b) given a ticket by a receptionist.
Depending on which unit type is used as an Entry Point, a ticket may be printed or not. Also, it is possible to physically keep the ticket within the system without printing it.
A receptionist issues the ticket from within the system. The settings window for the Reception role looks like this:
When the Receptionist works in one Branch only, no Branch choice is given in the window, likewise when the Receptionist has access to only one Entry Point.
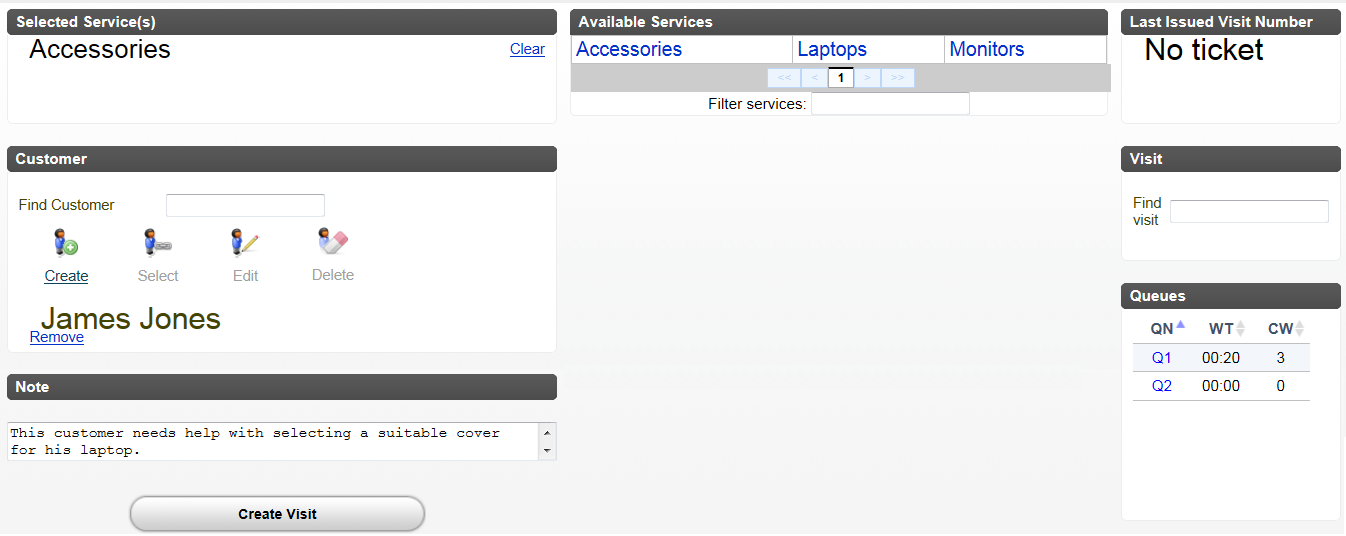
The Reception page could look like this:
To issue a ticket:
1. Choose Service by clicking the Service name. It is possible to choose several Services.
2. To add a Customer name to the ticket, click Create to create a new Customer, or enter part of a name in the search field to look up an existing Customer. Click Select to add the name to the ticket. This name is displayed when the ticket is called.
It is also possible to search for a specific Visit, by entering the complete ticket id (for example A001) in the Find Visit field to the right.
3. Depending on how your system is set up, it may also be possible to add notes about a Visit or Customer. This is done in the Note field, in the lower left corner. This note will be visible and editable in the Counter window.
4. Click the Create Visit button. If the Reception has a configured printer, the ticket is printed and can be handed to the Customer.
In the Queues area, you can find the following information:
• QN - Queue Name. Click on the Queue Name to open up a window containing all the Visits in that Queue. here you can transfer, or delete a Visit.
• WT - Waiting Time. Note that this value comes from the first Visit in the Queue and not the maximum Waiting Time of all Visits in the Queue.
• CW - Customers Waiting. Total number of Customers waiting in each Queue.
Click the sorting buttons (in the column headings for QN, WT, and CW) in the list of Queues to sort the columns according to Queue Name, Waiting Time, or number of Customers Waiting.
Multi-Service functionality
When issuing a ticket, it is possible to select several Services. If different Services target different Queues, the first Service defines what Queue the Visit will end up in, to start with. When that ticket is called, served, and then closed, the ticket will end up in the Queue of the second Service, and so on.
By default, the ticket will be transferred to the Queue of the next Service, sorted based on the Visit lifetime. However, this is a System Parameter that can be changed.
For more information, see the Reference Manual.


