General Configuration
There are a number of steps that need to be taken to configure API Gateway correctly.

We recommend that you go through this chapter completely, before you move on to all configuration performed in the
application.yml file.1.3.1. Generate an API Token
The purpose of the API token is to provide identification and separation of different apps, but also providing security, without need to provide Orchestra account information. Also, you get better control over the load on Orchestra.
To generate an API Token:
Run the script api-token-generator.bat, located in the <installation directory>\bin folder. We highly recommend that you run the script in a Command Prompt, so that the progress is visible.
1.3.2. Enabling HTTPS/SSL

This step is only necessary for production environments, it can be skipped for demo/test system purposes!
We recommend setting up the API Gateway using SSL, to make sure that the API token stays hidden.
To enable SSL/ HTTPS on the front-end of the API Gateway:
Set up SSL certificates, according to the normal Orchestra routines. For more information, see the Orchestra Reference Manual.
Make sure that the keystore.jks file is saved in <installation directory>\conf.
Further configuration is done in the application.yml file, later on.
1.3.3. Configuration in Orchestra
Depending on how you want to use the API Gateway, you will need to expose different connectors.
Access to the Mobile connector is configured in a slightly special way, compared to access to other connectors. So if you need access to the Mobile connector, please see
“Mobile Connector User” . For other connectors, see
Normal Connector User below.
Normal Connector User
For the API Gateway to work correctly with all connectors, except the Mobile connector, you need to create a User for this purpose in Orchestra. For Mobile connector users, see
“Mobile Connector User” .
Follow these steps:
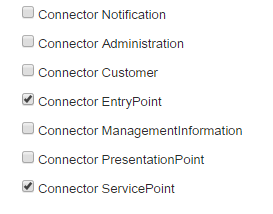
1. In the User Management application, create a new Role, called, for example, API User. In the lower right area, make sure that you select the applicable connectors for this Role, as in the following example:
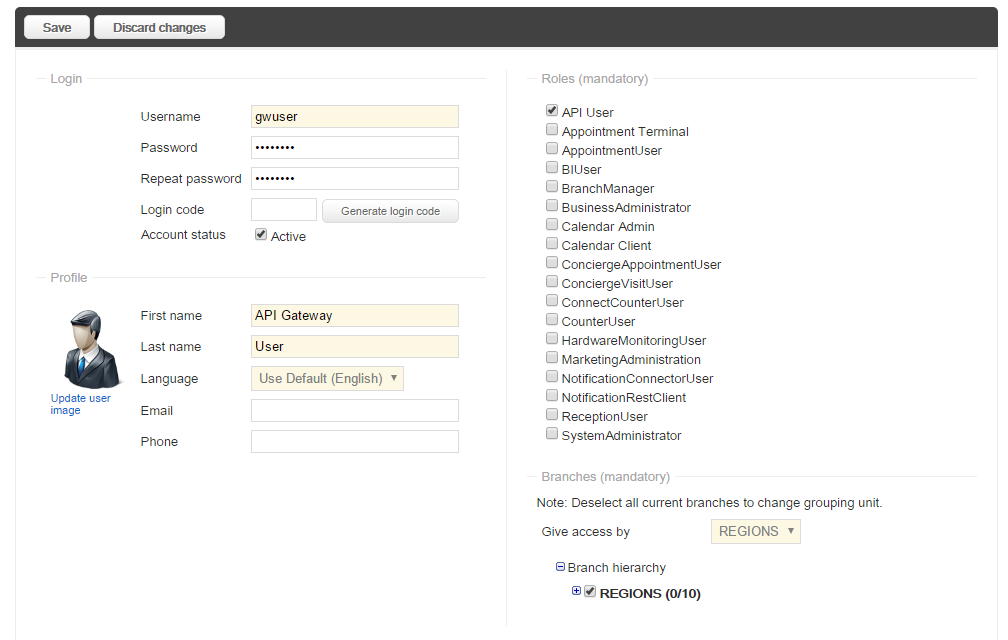
2. Create a new User, called, for example, gwuser, where you select the Role that you just created, see the example below.

It is important that this is a new User, since it is not allowed to rename an existing User.

Make a note of the password that you entered for this User, since you will need it later on.
Mobile Connector User

This is only applicable when using the Mobile connector!
1. In the System Administration application, in the Parameters tab, in the Mobile API (Central) section, change the password of the mobile User to your wanted password:
Do not forget to Save.
Unit Type
If you are going use a Mobile Connector User, add the VisitApp Unit Type in the System Administration application, in the Unit Types tab. Then, add it to your Equipment Profile, in the Business Configuration application, and configure it both on Equipment Profile and Branch level. For more information, see the Standard Unit Types Guide, found on Qmatic World.
Branches and Services
In the Business Configuration application, make sure that you have configured the Services and Branches that you want to be available via the API Gateway correctly. This means that the following needs to be configured:
• For both the Services and Branches, the Mobile enabled setting must be enabled.
• The current positions of the used Branches should be filled in, in the Longitude and Latitude fields.
1.3.4. Creating Encrypted Passwords
In order for the passwords not to be visible anywhere in plain text, the passwords for Orchestra should be encrypted when configuring the API key and the Orchestra user.
To create an encrypted password, run the script password-encoder.bat, located in <Installation directory>\bin. It is highly recommended that you run the script in a Command Prompt, so that you will see the encrypted password in clear text.
Make a note of the encrypted password, since you will be entering it into the
apllication.yml file at a later stage. For more information, see
“Configuration in application.yml” .
1.3.5. Opening Firewall on Host
You will need to open your firewall to port 9090.
This is done in the Windows Control Panel, by following these steps:
1. Open the Windows Firewall, in the Control Panel.
2. In the left menu, select Advanced settings.
3. Click on Inbound Rules, in the left menu, then New Rule to the right.
4. In the New Inbound Rule Wizard, select Port and click Next.
5. In the Specific local ports field, enter 9090. Click Next.
6. In the two following pages, click Next.’
Enter a Name and a Description for the rule, then click Finish.
 We recommend that you go through this chapter completely, before you move on to all configuration performed in the application.yml file.
 We recommend that you go through this chapter completely, before you move on to all configuration performed in the application.yml file.
 This step is only necessary for production environments, it can be skipped for demo/test system purposes!
 It is important that this is a new User, since it is not allowed to rename an existing User.
 Make a note of the password that you entered for this User, since you will need it later on.
 This is only applicable when using the Mobile connector!