Business Intelligence
This section describes how to set up secure communication for Business Intelligence/Tomcat.
Prerequisite
This section assumes:
• That you have installed Orchestra and set up secure communication for Orchestra Central, as described in
“Orchestra Central” .
• That you have installed Orchestra and Business Intelligence using http, i.e you entered http in the installation wizards.
• That you are using the same kind of certificate for Business Intelligence as in Orchestra. For a description of different kinds of certificates, please see
“Different kinds of certificates” .
Preparation
 It is possible to reuse the settings from Orchestra. It is also possible to create a new keystore file with different settings (Country, Organization, etc).
If you are using the same certificate as in Orchestra, copy the keystore.jks and truststore.jks files from <orchestra install dir>\system\conf\security to <bi install dir>\system\conf\security Replace the already existing files.
If you need to generate a separate certificate for Business Intelligence, a private key pair must be generated, which is done in the following way:
1. Open Keystore Explorer and select Open an existing keystore. Select the file <bi install dir>\system\conf\security\keystore.jks. The default password is changeit.
2. From the Tools menu, select Generate Keypair.
3. Select Algorithm and Key Size, eg RSA and 2048. Click OK.
4. In the next page, click the Edit name button next to the Name field.
5. Fill out your details. eg: CN=hostname , O=yourCompany, L=yourCity, S=yourState, C=yourCountry. Finally, click OK twice.
6. Give an Alias name, for example qpbusinessintelligence and click OK.
7. Enter and confirm a new password. Click OK.
Now you are ready to follow the procedure described below.
Certificate that is Already Signed and Ready to Use
 If you entered https
 url:s in the installation wizards, this procedure can be skipped.
 Before you start, make sure that you read the Prerequisite and Preparation sections above!
1. Open the file <bi_install_dir>\server\pentaho-server\tomcat\conf\server.xml.
a) Uncomment the SSL HTTP/1.1 Connector entry in the file.
b) Modify the file, to reflect your specific settings, for example:
<Connector port="8444" protocol="org.apache.coyote.http11.Http11NioProtocol" maxThreads="150" SSLEnabled="true" scheme="https" secure="true" clientAuth="false"sslProtocol="TLS"keystoreFile="C:\qmatic\bi\conf\security\keystore.jks" keystorePass="changeit"keyAlias="qpBi"/>
The keyAlias parameter is the entry name or the alias of the entry in the keystore file.
2. Open the file <bi_install_dir>\server\pentaho-server\pentaho-solutions\system\security.properties and edit it, so that protocol and port are the ones used for SSL.
Example:
central.orchestra.url = https://t54.qmaticcloud.com:8443
bi.url = https://t50.qmaticcloud.com:8444/businessintelligence
3. Open the file <bi_install_dir>\server\pentaho-server\pentaho-solutions\system\server.properties and edit it, so that protocol and port are the ones used for SSL.
Example:
fully-qualified-server-url = https//t50.qmaticcloud.com:8444/businessintelligence
4. Restart the Business Intelligence service.
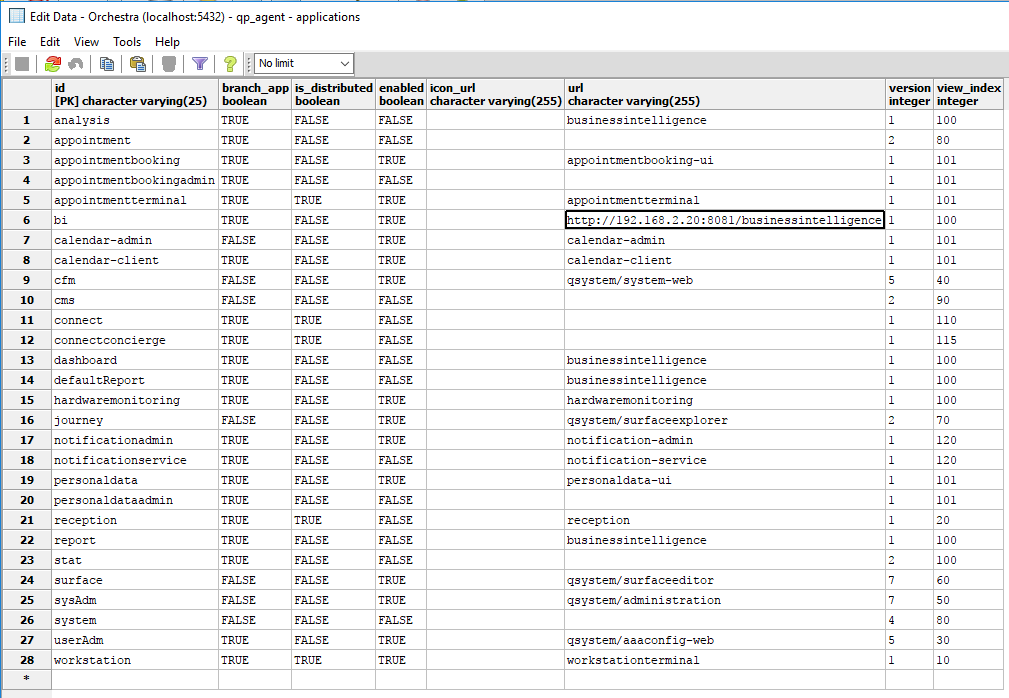
5. Edit the url to the Business Intelligence application in the database and make sure that protocol and port are set for SSL, in the following two tables:
• qp_central.applications
• qp_agent.applications
Example from PostgreSQL, qp_agent.applications table:
6. Edit the web_server_redirect_url to the Business Intelligence application in the database and make sure that protocol and port are set for SSL in the following table:
• qp_central.oauth_client_details
Updates to shiro.ini - Implementing Single Sign Off
To enable single sign off for Business Intelligence (closing both the Orchestra and the Business Intelligence session at the same time, via the Logout option in the Orchestra top bar), you need to manually update the shiro.ini file on the Orchestra server, located in <orchestra_install_dir>\conf\ in the following ways:
• Add the Business Intelligence logout URL to the orchestratedLogout.logoutUrls section, as in the following example:
#orchestratedLogout.logoutUrls = http://<separate-bi-server-hostname>:<bi-server-port>/businessintelligence/Logout
orchestratedLogout.logoutUrls = https://t167.qmaticcloud.com:8444/businessintelligence/Logout

Note that Logout must be written with a capital L!
Updates to shiro.ini - Adding the Business Intelligence Server IP
• Add the Business Intelligence Server IP to the following section:
/qsystem/rest/security/account/** = oauth2, noSessionCreation, ipFilter[127.0.0.1,0:0:0:0:0:0:0:1]
Example - How to Prevent Faulty Entry:
Update the section above to this:
/qsystem/rest/security/account/** = oauth2, noSessionCreation, ipFilter[127.0.0.1,192.168.22.50,got-antwin-005]

For the changes to take place, a restart of Orchestra is needed.


 It is possible to reuse the settings from Orchestra. It is also possible to create a new keystore file with different settings (Country, Organization, etc).
 If you entered https url:s in the installation wizards, this procedure can be skipped.
 Before you start, make sure that you read the Prerequisite and Preparation sections above!
 Note that Logout must be written with a capital L!
 For the changes to take place, a restart of Orchestra is needed.